Applications & Implications + Project Development
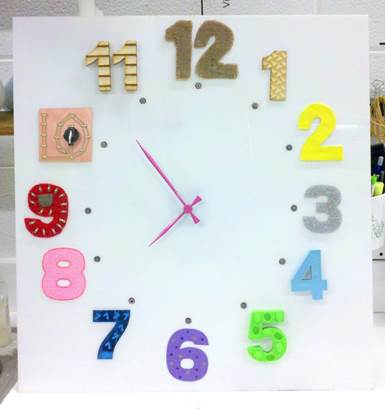
My final project is an interactive clock. The first time I came to my fab lab, I thought it would be neat to introduce all the machines and their products to a newcomer in a fun way, similar to interactive museum exhibits. If you have an idea you want to test out, it's important to know what tools and materials you'll use. I've decided to make a clock where each number was unique yet made in our Fab Lab. Each number will have a button you can press and the sign in computer nearby will have a web page pop open to how the number was made. Fab labs, makerspaces, and the like are amazing places filled with information. Not only will new patrons get to see and touch the numbers, they'll learn quickly what machines are available to them and an example of what you can produce. When not in use, the numbers will be fun to look at and tell time! My first step for this
endeavor was to sit down with a piece of paper and pen to sketch out the clock.
I don't think anyone has tried to make an interactive maker clock such as
this. The only thing that is similar is a tutorial kiosk, which I've only heard
about through a friend. This type of clock wouldnt have to be only used in Fab
Labs though. It could also be used in libraries or other public spaces to
deliver tutorials or information. Next I went to the computer to put together a
digital version with color and decide on a font. The trickiest part was
deciding which material/tool matched up with the numbers. Certain numbers where easier to design on
certain machines than others, and I wanted make sure each looked its best. Once
I had a more formal layout, I got to work making the numbers.
There are so many ways to go
about creating the numbers. The possibilities are endless, depending on where
the clock will live, should determine what the numbers are made of. For my
clock, I used the tools at our fab lab. A variety of processes and materials
will be used. As far as what tasks need to be completed, I have all of the
numbers made and a button processing code. Now I have to layout the numbers to
decide how the face will be constructed, I'm thinking about using a simple,
physical battery operated movement and hands, as I do not have a lot of time
left to complete the project. I eventually will replace the hands with LEDs,
possibly RGB. Some things that didn't work was machine milling out my number 7.
The bit continuously kept falling out and I had to go in another direction
because I wouldn't have time to receive new set screws in the mail. Two weeks
from now I will be a part of our mobile fab lab unit traveling and doing
workshops for a month nearly every day. This cuts off my final project time
significantly, but hopefully I will be able to accomplish my goals!
Some questions that need to be answered are, in addition to the face,
how the boards will be powered and whether or not to program them on the same
microchip. I am leaning towards using an ATTiny mega
328. Also need to determine exactly how to send the button input information to
the sign in computer. My options appear to be wirelessly or the sparkfun USB breakout board. These final steps are
essential to bringing my idea to life. I hope to accomplish them within two
weeks! I suppose I'll be evaluated on the design, numbers, and programming. The
real test will be when the clock is complete and hung up in our fab lab for
patrons to use. I am excited to see if
it will be helpful to the fab lab, as we often times have new patrons that are
curious about what machines and tools are available to use. When I got to
making my clock face, I had to use a large sheet of 1/8 acrylic. It would not
fit in our 24 X 12 inch laser bed though. I found that I could split the job in
half and trick the epilog into thinking its front panel was closed when it was
not. I just had to hold the acrylic very still while it was lasered.
Something I've learned throughout working on this project is that it was a lot
more expensive than I originally thought it would be. If this were to be
recreated and tailored for another place, the cost could certainly be reduced
by using different materials to create the numbers. The numbers are a very
literal example of the mastery of my skills.
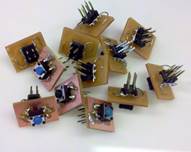 Today I
made 12 button boards, the face of the clock, put all the pieces together:
Today I
made 12 button boards, the face of the clock, put all the pieces together:
1) 1/8 inch birch plywood-epilogue laser =$2(time
on laser, scrap wood)
2)
Vinyl
Leather-sewing machine=$2 (materials)
3)Glitter Acrylic-Epilog Laser=$5.50(material & laser time)
4)
Flexible
Oodoo-molding material=$15(filament & oodoo)
5)
3D Print
Hips-Up mini printer=$3.55(filament)
6)
Vinyl
Sticker-Silhouette=free (from scrap vinyl)
7)
Mirrored
Acrylic-Epilog Laser=$5.50(material & laser time)
8)
Embroidered
Patch-embroidery machine=$2(thread & machine use)
9)
Soft
Circuit Felt-hand sewing=$17.85(LEDs, conductive thread, battery, &
conductive pocket)
10)
PCB
Circuit-Roland Modela=$6(PCB, LED, battery holder,
battery)
11)
123DMake-Laser=$1(laser
time, scrap wood)
12)
Resin
Burlap-Composite=$2(donated burlap, 1/4cup resin)
13)
Hands
& clock movement=basement find
14)
1/8
white acrylic=$20(local supplier)
15)
Button
Boards=$6(button boards, PCB, headers)